
How to Find Your Ring Size at Home | 4 Easy Methods
You’ve found the ring. You’re ready to order. Then comes the moment that trips up almost everyone: you have no idea what size to choose. Order too small and it won’t go past your knuckle. Order too big and it spins off your finger the first time you reach for something.
The good news is that you don’t need a trip to the jeweler to nail this. With a ruler and something as simple as a strip of paper, you can measure your ring size at home and get a result that’s close enough to confidently place your order. This guide covers four reliable methods, a full US ring size chart, and the timing and technique details that most guides skip entirely.
Quick Answer: Wrap a thin strip of paper around the base of your finger, mark where it overlaps, measure the length in millimeters, and match it to the ring size chart below. For most people, this takes under two minutes.
What Is a Ring Size?
A ring size is a number that corresponds to the inner circumference (or diameter) of a ring, measured in millimeters. In the US, sizes run on a numeric scale from about 3 to 13, with half-size increments available. Every half size represents a change of roughly 0.4mm in diameter.
Average ring sizes: Women typically fall between a US size 5 and 7, with size 6 being the most common. Men typically fall between a US size 9 and 11, with size 10 being most common. These are starting points only. Always measure before ordering anything expensive.
Ring size is not universal. UK, EU, and Japanese sizing systems use different scales, so if you’re ordering from an international retailer, use their conversion chart rather than assuming your US size translates directly.
The Best Time to Measure Your Finger
Your finger size isn’t fixed. It changes throughout the day and in response to temperature, activity level, and hydration. Ignoring this is one of the most common reasons people end up with a ring that fits fine in the store but feels wrong a week later.
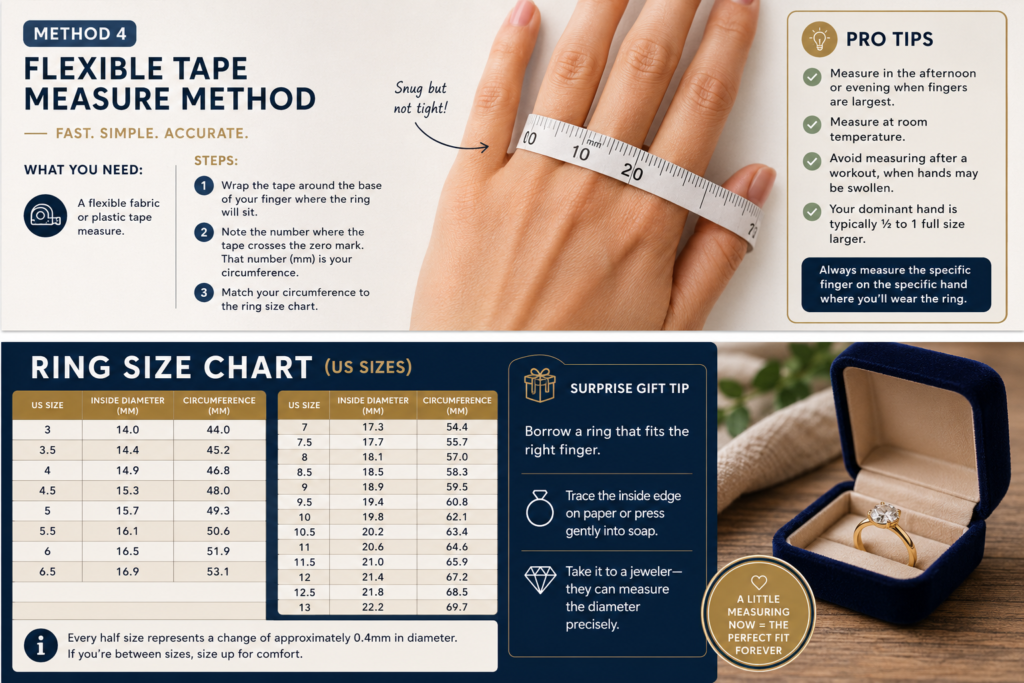
Measure in the afternoon or evening. Fingers are naturally slightly larger later in the day due to normal fluid distribution. A ring sized in the morning, when fingers are at their smallest, may feel tight by afternoon.
Measure at room temperature. Cold fingers shrink and can measure up to half a size smaller than normal. Avoid measuring right after coming in from the cold, after a swim, or after waking up.
Avoid measuring after a workout. Physical activity causes temporary swelling that can inflate your measurement by half a size or more.
Pro tip: Your dominant hand is typically half a size to one full size larger than your non-dominant hand. Always measure the specific finger on the specific hand where you plan to wear the ring.
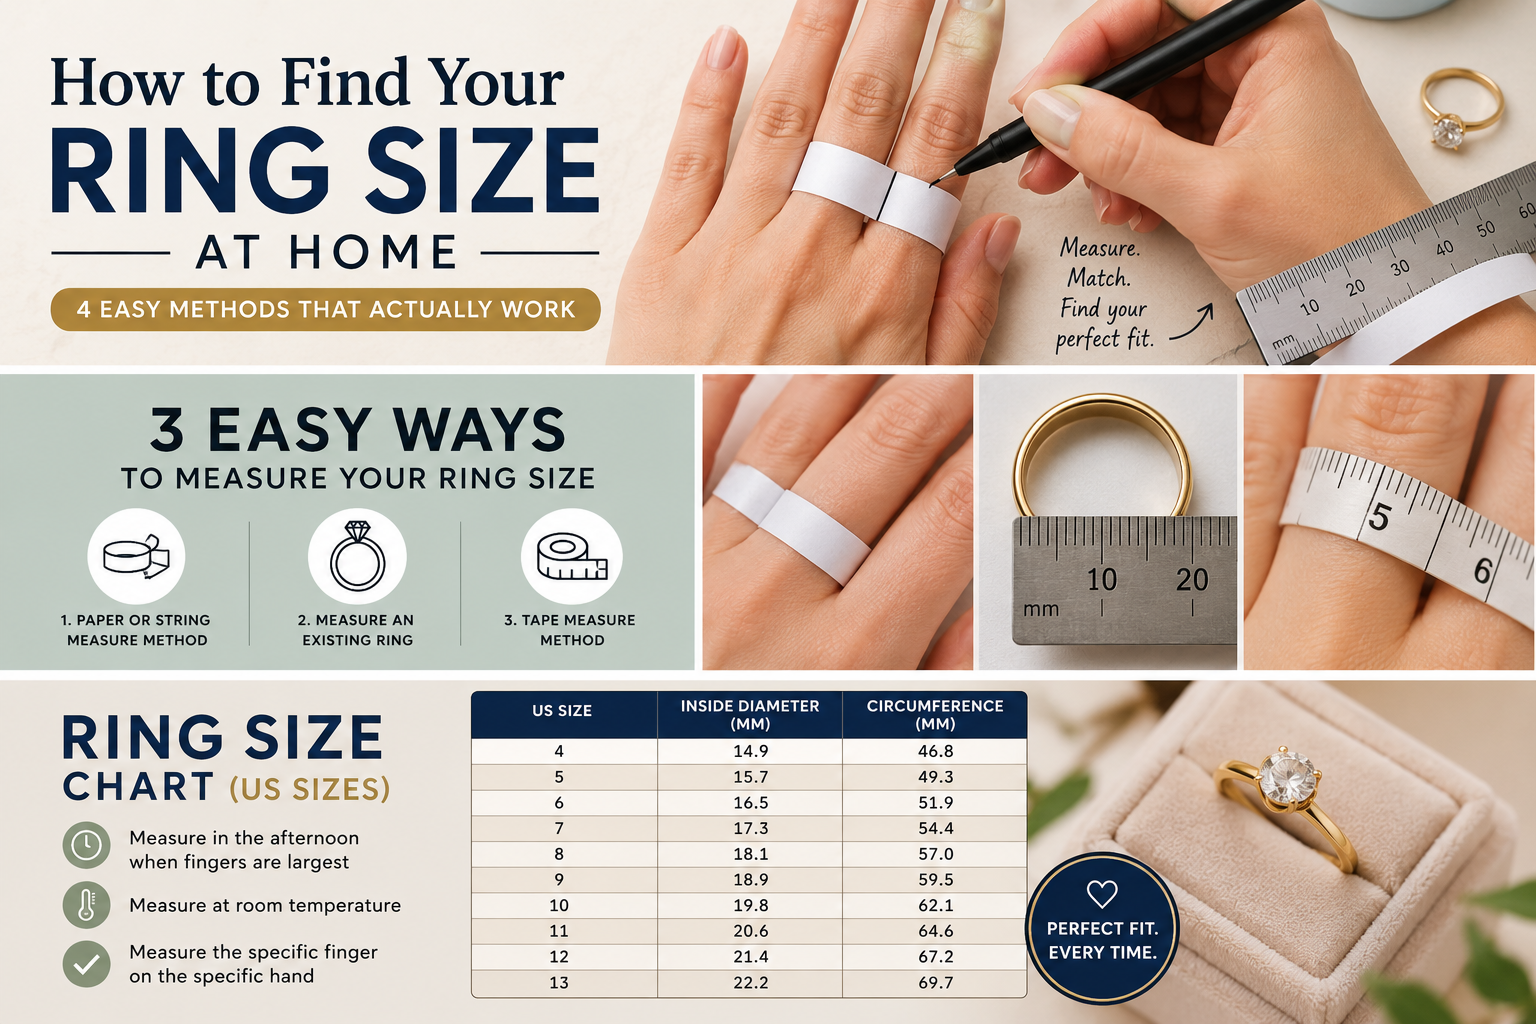
Method 1: The String or Paper Strip Method
This is the most widely used at-home method and works well when you have no other tools. A thin strip of paper tends to give slightly more consistent results than string because it doesn’t stretch.
What you need: A strip of paper (about 6 inches long, half an inch wide), a pen, and a ruler.
Steps
Cut a thin strip of paper or use a non-stretchy piece of string.
Wrap it snugly around the base of the finger you plan to wear the ring on. The paper should sit flat against your skin without compressing it.
Hold the paper in place and check that it passes over your knuckle comfortably. If it doesn’t, your ring won’t go on, so size for the knuckle.
Mark the exact point where the paper overlaps with a pen.
Unroll the paper and lay it flat against a ruler. Measure from the end to your mark in millimeters. That number is your finger circumference.
Find your circumference in the ring size chart below to determine your US size.
Common mistake: Wrapping the paper too tightly gives you a circumference that’s smaller than your actual finger. The paper should feel snug but not constrict the skin. If you can’t pull it over your knuckle when wrapped, you’ve gone too tight.
Method 2: Measure an Existing Ring
If you already own a ring that fits the intended finger well, this is the most straightforward method. It’s also the best option for surprise gift purchases, since you can measure without the other person ever knowing.
What you need: A ring that fits the correct finger, a ruler, and the ring size chart below.
Steps
Select a ring you know fits the specific finger and specific hand where the new ring will be worn. A ring from a different finger will give you the wrong size.
Place the ring on a flat surface and measure the inside diameter — the distance across the opening — in millimeters.
Match your measurement to the diameter column in the ring size chart below.
For surprise proposals: Borrow a ring your partner wears on their left ring finger for a few minutes. Trace the inside edge onto a piece of paper with a sharp pencil, or press the ring gently into a bar of soap to create an impression. Take that tracing or impression to a local jeweler and they can read the diameter precisely.
Method 3: Flexible Tape Measure Method
If you have a sewing tape measure at home, this is the fastest approach. It skips the marking and cutting steps entirely and gives you the circumference reading directly.
What you need: A flexible fabric or plastic measuring tape. Do not use a rigid metal tape measure.
Steps
Wrap the tape measure around the base of your finger where the ring will sit.
Note the number where the tape crosses the zero mark. That number, read in millimeters, is your circumference.
Match your circumference to the ring size chart below.
Important: Do not pull the tape taut. It should feel the way a ring would: sitting against the skin without compressing it. Pulling tight will give you a reading that’s half a size or more too small.
Method 4: Printable or Plastic Ring Sizer
For the closest thing to a professional measurement at home, a printable ring sizer or a plastic ring sizer tool gives you the most accurate result.
Printable ring sizer: Many jewelry retailers offer free downloadable ring sizer PDFs. Print at 100% scale with auto-scaling turned off (check that a printed ruler on the sheet matches an actual ruler before using). Cut along the slit line, thread the pointed end through the slit to form a loop, wrap it around your finger, and read the number at the slit opening.
Plastic ring sizer tool: These are small, reusable, zip-tie-style tools with numbered increments. They cost between $1 and $5 online, slip over the knuckle, and give you a reading that closely mimics an in-store professional fitting. If you buy rings online regularly, it’s worth picking one up.
Pro tip: A plastic ring sizer is more reliable than string or paper because it doesn’t stretch or slip. It’s especially useful for wider band styles, where getting within a quarter size matters more.
US Ring Size Chart
Use the table below after measuring your finger circumference or an existing ring’s inner diameter. If your measurement falls between two rows, size up for a more comfortable fit.
| US Size | Circumference (mm) | Diameter (mm) |
| 4 | 46.8 | 14.9 |
| 4.5 | 48.0 | 15.3 |
| 5 | 49.3 | 15.7 |
| 5.5 | 50.6 | 16.1 |
| 6 | 51.9 | 16.5 |
| 6.5 | 53.1 | 16.9 |
| 7 | 54.4 | 17.3 |
| 7.5 | 55.7 | 17.7 |
| 8 | 57.0 | 18.1 |
| 8.5 | 58.3 | 18.5 |
| 9 | 59.5 | 18.9 |
| 9.5 | 60.8 | 19.4 |
| 10 | 62.1 | 19.8 |
| 10.5 | 63.4 | 20.2 |
| 11 | 64.6 | 20.6 |
| 11.5 | 65.9 | 21.0 |
| 12 | 67.2 | 21.4 |
| 13 | 69.7 | 22.2 |
How Band Width Affects Your Ring Size
A ring’s width changes how it feels on your finger, even at the same numeric size. This is one of the most overlooked variables in at-home sizing, and it’s especially important for engagement rings, signet rings, and stacking sets.
Thin bands (under 4mm): Size as measured. These fit true to size for most people.
Standard bands (4mm to 6mm): Size as measured, but consider going up a quarter size if your knuckle is noticeably wider than the base of your finger.
Wide bands (over 6mm): Go up half a size from your measured circumference. Wide bands cover more skin and prevent the natural compression that lets a ring sit comfortably, so they fit noticeably tighter than a thin band of the same size.
Stacking rings: If you plan to stack two or more rings on the same finger, consider sizing up a quarter size on the rings that will sit at the base, since the combined pressure adds up over the course of a day.
3 Common Sizing Mistakes and How to Avoid Them
1. Measuring When Your Fingers Are Cold
Cold fingers can measure up to half a size smaller than normal. Always measure at room temperature, never right after being outdoors in cold weather or after washing your hands with cold water.
2. Wrapping the String or Paper Too Tightly
The most common error in the string and paper method is pulling the material snug enough that it compresses the skin. A properly wrapped strip should feel like a ring: sitting on the finger without cutting into it. Test by making sure the wrapped strip passes over your knuckle before marking it.
3. Measuring Only Once
Finger size fluctuates during the day. Measure at least twice at different times: once in the afternoon and once in the evening. If you get two different readings, take the larger one as your size. For an expensive ring like an engagement ring or wedding band, measure on three different days before deciding.
Frequently Asked Questions
What is the most accurate way to find my ring size at home?
The most accurate at-home method is a plastic ring sizer, which gives a professional-grade reading for about $1 to $5 online. If you don’t want to order a tool, the paper strip method gives a reliable estimate: wrap a thin strip of paper around the base of your finger, mark the overlap, and measure in millimeters against the chart above.
Can I find my ring size without any tools?
Not reliably. You need some way to measure circumference or diameter in millimeters. The minimum setup is a strip of paper and a ruler, both of which are available in almost any home. Using a ruler app on your phone works in a pinch, but verify the scale is accurate before trusting the reading.
How do I find someone else’s ring size without them knowing?
Borrow a ring they already wear on the correct finger for a few minutes and measure its inner diameter with a ruler. Trace the inside edge onto paper if you want a reference. Make sure the ring comes from the same finger and same hand where the new ring will be worn. Rings worn on the middle or index finger won’t give you the correct size for the ring finger.
What time of day should I measure my ring size?
Measure in the afternoon or early evening, when your fingers are at their natural largest due to normal daily fluid movement. Avoid measuring in the morning, after exercise, after cold exposure, or after eating a salty meal. Measure two or three times across different days for the most consistent reading.
What if I’m between two ring sizes?
Size up. A ring that’s slightly too large can be adjusted down more easily and inexpensively than a ring that’s too small can be stretched. Most jewelers can resize rings down by up to two sizes without significantly affecting the ring’s structure. Eternity bands and rings with stones set all the way around are the main exception, as resizing them is more complex.
Does ring size differ between hands?
Yes. Your dominant hand is typically half a size to one full size larger than your non-dominant hand. Always measure the specific finger on the hand where you intend to wear the ring. Engagement rings and wedding bands are traditionally worn on the left ring finger, so measure that finger specifically if that’s where the ring will live.
When to Visit a Jeweler Instead
At-home methods are accurate enough for most ring purchases, but there are situations where an in-person professional sizing is worth the extra step. If you’re buying a ring that can’t be resized (like an eternity band or a titanium or tungsten ring), get professionally sized before ordering. The same applies if your finger has a significantly wider knuckle than base, which makes at-home sizing less reliable.
Most jewelry stores will size your finger for free, even if you’re not buying from them. If you’re already visiting a store to look at rings, getting sized takes about two minutes and removes all the guesswork.
For everyone else, the paper strip method or a cheap plastic sizer will get you close enough to order with confidence. Measure twice, use the chart, size up if you’re between two options, and you’ll rarely end up with a ring that needs returning.

Abhishek Nale is a digital publisher, SEO strategist, and content creator behind the-daily.buzz. He writes and curates content across technology, business, finance, lifestyle, health, travel, and trending topics, with a focus on creating clear, practical, and engaging content for modern readers.